|
|||
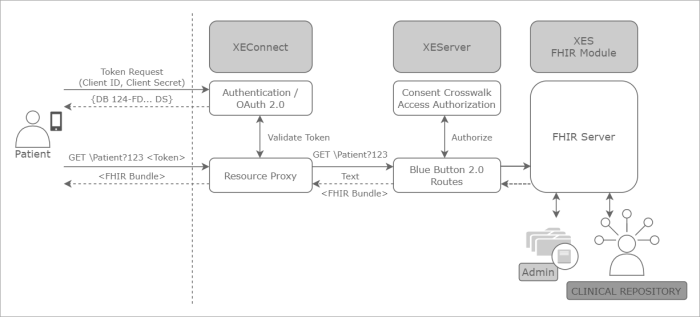
Authentication SetupThe Interoperability and Patient Access Rule requires from payers to implement and maintain secure patient data access through API. A patient should be able to access the data securely using a mobile application, a website, or any other client. Edifecs XEConnect acts as the Identity Management application that handles both end-user identity verification (validates patients' credentials) and client application registration. XEConnect provides reliable and secure authorization through the OAuth 2.0 standard and enables third-party applications to request authorization to access FHIR resources in an interoperable, REST-like way. In OAuth, a third-party client (for example, a mobile application) requests access to resources controlled by the resource owner (XES Module for FHIR) and hosted by the resource server (a FHIR server). The client obtains an access token (a string with the access attributes) issued by the authorization server (XEConnect) with the approval of the resource owner. The client then uses this token to access the protected resources hosted by the resource server (to authorize requests from third-party applications, XEConnect verifies the attached tokens). You must pre-register your application client in XEConnect and obtain Client ID and Client Secret that are used to request an access token.
1 Pre-register a clientXES Module for FHIR uses the XEServer profile FHIR Authorization and a pre-configured XEConnect service Authorization that makes the FHIR server available using the OAuth 2.0 authentication type through the following URL: http://host:port/edifecs/fhir/R4/. This service issues JWT tokens that are used to authorize user requests and to limit patient access to the FHIR resources. You must pre-register a client application (a browser, a web service, a mobile app, and so on) to let the Authorization service issue tokens to this client. To pre-register, you must first create a new client and define the permitted FHIR resources (OAuth scopes) that the client application can request, the redirect URIs, the permitted grant types, the intended token recipients, and so on. The Client ID and Client Secret are generated during client registration. One client represents one application to be authorized. For more information on how to add a new client, see XEConnect Help Center. The following is the procedure for this sample scenario. To add a sample client application:
2 Set up user accessYou must define a list of members (in this sample scenario, a list of patients) who can access and extract FHIR resources through a third-party client (for example, a mobile application). In production environments, you can link XEConnect to an existing identity repository, such as LDAP, Active Directory, and so on. In this sample scenario, you use a JSON configuration file that contains a list of permitted patient's credentials (logins and passwords that patients use to log into a client application) located at ${XESProfileConfig}/oauth/users.json. In this sample scenario, the configuration that allows Lara Mirren to access the FHIR resources is as follows: { "id":"1", "login":"lara.mirren@domain.com", "password":"password", } 3 Update FHIR IDTo make sure a patient has access only to the permitted data (his/her data only), you must associate user credentials (a patient's login and a password) with the corresponding patient's FHIR ID. In production environments, this is done automatically by using, for example, the Member ID stored in the FHIR resource. Alternately you can use other options. In this sample scenario, you use a crosswalk file that maps the user login to FHIR ID values. This ensures that a patient has access only to his/her data. This also defines what FHIR resources each patient will be able to access. When you add a new patient to the FHIR server, the patient gets a FHIR ID. For this sample scenario, you must update the FHIR ID of the sample patient (Lara Mirren) in the following crosswalk file: ${ECRootPath}\repository\User\Crosswalks\XESModuleForFHIR\FHIR-Security\crosswalk_fhir_security.crsw. For the login lara.mirren@domain.com, enter the FHIR ID assigned by the FHIR server (you can find the FHIR ID in the patient's data on the web portal). To edit crosswalks, you can use SpecBuilder. Note In this sample scenario, the FHIR ID of the test patient Lara Mirren is 22. However, you must use the value that the patient Lara Mirren received after you have uploaded the test data to the FHIR server. In the Resources column, enter the FHIR resources that must be available for this patient. For this sample scenario, add the following resources: Encounter, Coverage, AllergyIntolerance, ExplanationOfBenefit.
Note This step is required for this demonstration scenario only. On a production environment, you will be able to use the patient database. After you have configured the authentication, you can access the patient data securely through the API. |
.png)

