Profile Overview
When a patient moves from one payer to another, the continuity of care should ideally not be interrupted. Currently, new payers and the patients often do not have the information that is required for the treatment to be continued or to make a decision on whether some lines of treatment are required or medically relevant. As a result, patients may experience:
- an interruption in the continuity of medical treatment,
- issues with the sharing of additional pertinent information,
- and increased costs due to the repetition of laboratory or diagnostic tests before adopting the new line of treatment that complies with the new payer policies.
With the authorized transmission of information from the previous payer to the current payer, the new payer will have access to the information on the treatment that is currently underway, the rationale for the treatment, and the preliminary steps that have been undertaken to show the medical necessity of the current course of treatment. Automation of information exchange and optimization of the computability of the data transmitted improve the safety of the patients, and reduce costs, since the process of information exchange that could take weeks or months is reduced to a few days or sometimes even a few minutes.
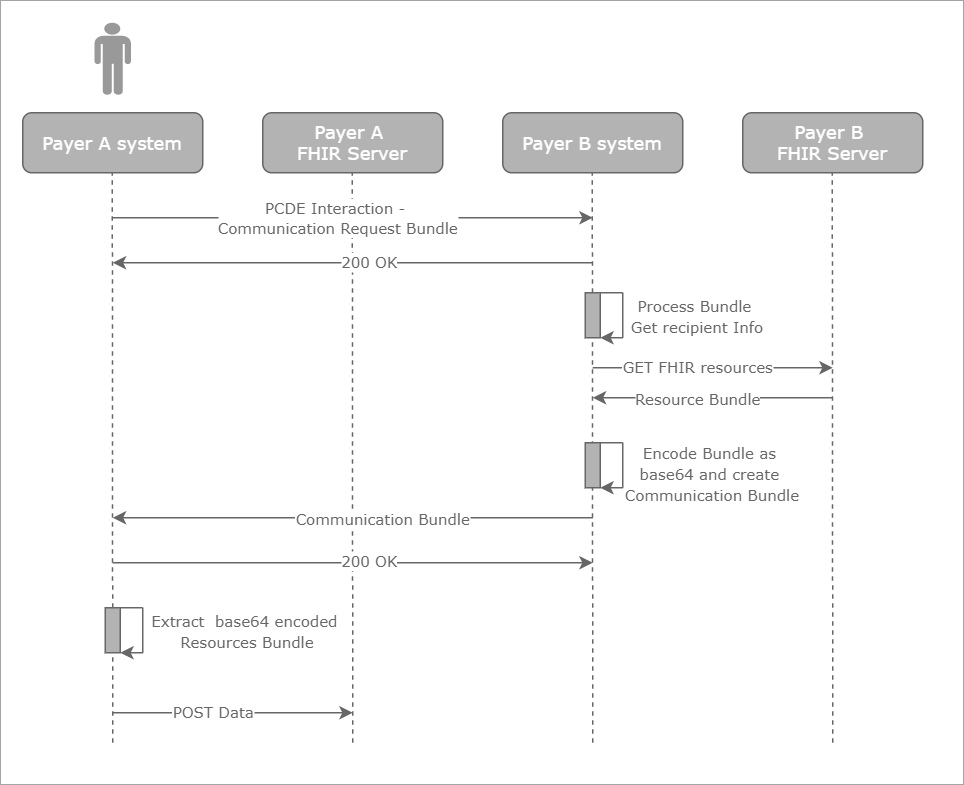
The profile represents the general Da Vinci Payer Coverage Decision Exchange (PCDE) case study (currently based on the Da Vinci PCDE IG dated Q1 2020 which is subject to change to conform to the CMS/ONC rules) that implements the following flow where Payer A and Payer B are involved in the interaction:
- A patient who has recently been a customer of Payer B moves to Payer A.
- Payer A prepares a special bundle CommunicationRequest to retrieve the information on the patient's treatment from Payer B for the services previously provided.
- Payer A sends the bundle to Payer B to start the interaction Payer Coverage Decision Exchange (PCDE).
- Payer B receives the bundle Communication Request, and then responds with 200 OK (an acknowledgement of receipt) to Payer A.
- Payer B prepares the required information, creates a special Communication bundle, and then sends the bundle back to an endpoint specified by Payer A.
- Payer A stores the requested information on a FHIR server.
The profile FHIR Da Vinci (PCDE) - Payer-to-Payer walks you through a scenario where the previous payer securely and efficiently shares information on a certain patient with the current payer after the patient has moved to another health insurance plan. This case study:
- ensures the smooth continuity of treatment,
- eliminates a repeat of laboratory or diagnostic tests,
- avoids the repeat of previous lines of treatment, and so on.
In this scenario, you will be the new payer requesting information about a specific user.
Profile Location
Edifecs Library / FHIR / Da Vinci Use Cases / Da Vinci - (PCDe) - Payer-to-Payer
Requirements
- XEServer Module for FHIR 9.2.1
- Edifecs XEngine 9.2 or later
- Edifecs XEServer 9.2.1 or later
- Edifecs Application Manager (EAM) 9.2.1 or later
- XEConnect 9.2.1 or later
 Profile Execution Profile Execution
The entire profile workflow comprises two major steps:
- Creation of a communication request. At this stage, you ("new" payer) form a bundle with a communication request resource and submits the resource to the "old" payer.
- Submittal of the requested data to the FHIR server. Represents the steps to be performed when you receive a response containing requested information from the "old" payer and submit the patient data to your FHIR server.
Note To successfully go through all the execution steps, you will need the following information:
the identifier of the patient whose information is going to be transmitted to you, the ID and the endpoint of the "old" payer's organization, and the ID of your organization.
Before you start the profile, create a new client that will be issuing access tokens required for authorization.
Click to see how to set up authorization
- On the EAM System tab, expand XEConnect.
-
Expand Authorization, double-click <ClientManagementName>, and then click New. The New client dialog is displayed.
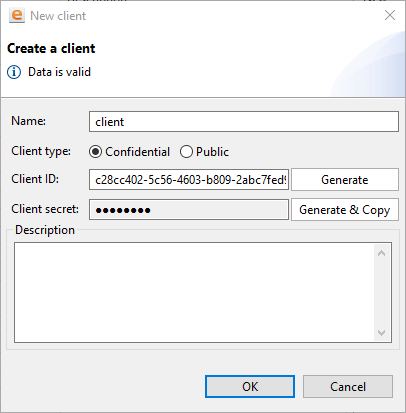
- In the New client dialog, enter the following settings:
| Name | Specify the client name. This name is used to display the client in Client Management. | | Client type | Select Confidential. For information on differences between the two client types, click here. | | Client ID | Specify a unique identifier to register the client in Client Management. To issue an access token, the Authorization service receives a client ID and checks: - if the client with the ID is registered in Client Management,
- if the grant type, for which the token is required, is allowed for this client.
The client ID is assigned just once when you create a new client and cannot be changed later. The ID should be unique within the scope of one Client Management. | | Client Secret | Click Generate & Copy to generate a new secret key and copy the key to the clipboard. Note Once you generate a secret key, save the key immediately in a secure location while the key is in the clipboard. You cannot copy the key later, you can only generate a new one. | | Description | Enter a description for the client. |
- Click OK.
- On the client configuration tab, select Client Credential as the grant type and enable the following scopes:
- system/Patient.read
- system/Organization.read
- system/Endpoint.read
- system/CommunicationRequest.*
If the scopes above are not available, on the Outline tab, click Scopes, add the required scopes, and then enable them for the new client.
- Save the changes.
Request an access token through Postman application:
- In Postman, create a new basic request. For more information, visit the Postman Learning Center.
- On the Authorization tab, in TYPE, select OAuth 2.0.
- In Add authorization data to, select Request Headers.
- On the Authorization tab, click Get New Access Token.
- In GET NEW ACCESS TOKEN, do the following:
- In Token Name, enter XEConnect.
- In Grant Type, select Client Credentials.
- In Access Token URL, enter https://localhost:18088/oauth/token. The host and the port number are in EAM, in the FHIR Authorization profile. To retrieve them, open the profile configuration, and go to the Environment tab. You can view the host and the port number in IssuerURL and WSPort values.
- In Client ID and Client Secret, copy the ID and the secret of the client used in this scenario.
- Leave the Scope field empty. The information on the available scopes is taken from the settings of the authorization client you have created.
- In Client Authentication, select Send client credentials in body.
- Click Request Token and click Use Token.
Communication Request Bundle
Once you get a valid access token, you are ready to form a new communication request and submit the resulting bundle to the "old" payer. To initiate the communication request bundle creation:
- Ensure that the profile FHIR Da Vinci - (PCDe) - Payer-to-Payer is up and running.
- In Postman, make a GET request to:
https://{profileHostName}:{profilePortNumber}/rest/pcde/create-communication-request?patient.identifier={patientID}&sender-org.identifier={senderID}&recipient-org.identifier={recepientID} where: - {profileHostName} and {profilePortNumber} are the host name (or IP address) and port number of the profile (available on the Settings tab of the component RESTful Web Service Inbound of the route PCDe Create CommunicationRequest),
- {patientID} is the ID of the patient whose information is requested from the "old" payer,
- {senderID} is the ID of the "old" payer's organization,
- {recepientID} is the ID of your organization ("new" payer).
As a response, you get a FHIR bundle that includes the resource CommunicationRequest along with the information on the endpoint to which the resulting data must be sent (available on the Settings tab of the component RESTful Web Service Inbound of the route Submit Communication Bundle). This bundle also carries information on the "old" payer's endpoint to which the communication request must be sent to. Note For the production environment, the response from previous payer must carry a valid access token. Click to view a sample communication requestCopyresponseWithCommunicationRequest {
"type": "collection",
"entry": [
{
"resource": {
"sender": {
"reference": "Organization/4"
},
"status": "active",
"requester": {
"reference": "Organization/5"
},
"resourceType": "CommunicationRequest",
"payload": [
{
"extension": [
{
"valueCodeableConcept": {
"coding": [
{
"display": "pcde",
"code": "pcde",
"system": "http://hl7.org/fhir/us/davinci-pcde/CodeSystem/PCDEDocumentCode"
}
]
},
"url": "http://hl7.org/fhir/us/davinci-cdex/StructureDefinition/cdex-payload-clinical-note-type"
}
],
"contentString": "Please send previous coverage information."
}
],
"subject": {
"reference": "Patient/1"
},
"recipient": [
{
"reference": "Organization/5"
}
],
"id": "11"
}
},
{
"resource": {
"resourceType": "Patient",
"id": "1",
"meta": {
"versionId": "1",
"lastUpdated": "2020-09-07T19:10:00.833+03:00",
"source": "#ORdNyo7swx7Ea5AX"
},
"identifier": [
{
"value": "Edifecs_0000006"
}
],
"name": [
{
"use": "official",
"family": "Fellow",
"given": [
"Richard"
]
}
],
"gender": "male",
"birthDate": "1961-06-08",
"address": [
{
"line": [
"260 and 270 Dorffel Drive E."
],
"city": "Seattle",
"state": "WA",
"postalCode": "98121"
}
]
}
},
{
"resource": {
"resourceType": "Organization",
"id": "4",
"meta": {
"versionId": "1",
"lastUpdated": "2020-09-07T19:10:09.567+03:00",
"source": "#vWKV0QonkIgogKDL"
},
"identifier": [
{
"value": "1001"
}
],
"type": [
{
"coding": [
{
"system": "http://hl7.org/fhir/organization-type",
"code": "prov",
"display": "Healthcare Provider"
}
]
}
],
"name": "Any Org",
"telecom": [
{
"system": "fax",
"value": "(+1) 734-677-6611"
}
],
"address": [
{
"line": [
"3300 Washtenaw Av, Suite 27"
],
"city": "Ann",
"state": "WA",
"postalCode": "48104",
"country": "USA"
}
],
"endpoint": [
{
"reference": "Endpoint/2"
}
]
}
},
{
"resource": {
"resourceType": "Endpoint",
"id": "2",
"meta": {
"versionId": "1",
"lastUpdated": "2020-09-07T19:10:04.362+03:00",
"source": "#eLkWxMkJWRIkN0R8"
},
"address": "http://localhost:20100/rest/anyOrg"
}
},
{
"resource": {
"resourceType": "Organization",
"id": "5",
"meta": {
"versionId": "1",
"lastUpdated": "2020-09-07T19:10:11.981+03:00",
"source": "#sKNI1IrRbrVEGDLL"
},
"identifier": [
{
"value": "1002"
}
],
"type": [
{
"coding": [
{
"system": "http://hl7.org/fhir/organization-type",
"code": "prov",
"display": "Healthcare Provider"
}
]
}
],
"name": "Cerner",
"telecom": [
{
"system": "fax",
"value": "(+1) 734-677-6611"
}
],
"address": [
{
"line": [
"3300 Washtenaw Av, Suite 27"
],
"city": "Ann",
"state": "WA",
"postalCode": "48104",
"country": "USA"
}
],
"endpoint": [
{
"reference": "Endpoint/3"
}
]
}
},
{
"resource": {
"resourceType": "Endpoint",
"id": "3",
"meta": {
"versionId": "1",
"lastUpdated": "2020-09-07T19:10:07.010+03:00",
"source": "#wVysN2P714gP5Y15"
},
"address": "http://localhost:20100/rest/Cerner"
}
}
],
"resourceType": "Bundle"
}
Submittal to FHIR Server
At this step, you receive the requested data and submit it to your FHIR server:
- Ensure that the profile FHIR Da Vinci - (PCDe) - Payer-to-Payer is running.
- In Postman, make a POST request to:
https://{profileHostName}:{profilePortNumber}/rest/pcde/submit-communication-bundle where - {profileHostName} and {profilePortNumber} are the host name (or IP address) and port number of the profile,
The POST request body must carry the communication bundle (Content-Type: application/json) with the payload that has been transmitted from the "old" payer. Click to view the sample POST request bodyCopy{
"resourceType": "Bundle",
"entry": [
{
"resource": {
"id": "11111111",
"resourceType": "Patient",
"basedOn": [
{
"identifier": {
"value": "6D2FD848-8595-488C-AC6B-DDA47514C586"
}
}
],
"name": [
{
"use": "official",
"family": "Fellow",
"given": [
"Richard"
]
}
],
"birthDate": "1961-06-08"
}
},
{
"resource": {
"resourceType": "Organization",
"id": "3000",
"name": "Any Org"
}
},
{
"resource": {
"resourceType": "Organization",
"id": "3001",
"name": "Cerner"
}
},
{
"resource": {
"resourceType": "Communication",
"sender": {
"reference": "Organization/3000"
},
"recipient":[
{
"reference": "Organization/3001"
}
],
"subject": {
},
"basedOn": [
{
"identifier": {
"value": "6D2FD848-8595-488C-AC6B-DDA47514C586"
}
}
],
"payload": {
"contentAttachment": {
"contentType": "base64",
"data": [
"ewogICJyZXNvdXJjZVR5cGUiIDogIkJ1bmRsZSIsCiAgImVudHJ5IiA6IFsKICAgIHsKICAgICAgInJlc291cmNlIiA6IHsKICAgICAgICAicmVzb3VyY2VUeXBlIiA6ICJPcmdhbml6YXRpb24iLAogICAgICAgICJuYW1lIiA6ICJTb21lIE9yZyIKICAgICAgfQogICAgfQogIF0KfQ=="
]
}
}
}
}
]
}
As a response, you get a bundle indicating that new resources have been created on your FHIR server.
Click to view a sample response
Copy
{
  "resourceType": "Bundle",
  "id": "bc0d34f9-49bc-4c85-a300-b12272f73e1b",
  "type": "transaction-response",
  "link": [
    {
      "relation": "self",
      "url": "https://127.0.0.1:12443/hapi-fhir-server/R4"
    }
  ],
  "entry": [
    {
      "response": {
        "status": "201 Created",
        "location": "Organization/10/_history/1",
        "etag": "1",
        "lastModified": "2020-09-07T19:33:36.981+03:00"
      }
    },
    {
      "response": {
        "status": "201 Created",
        "location": "Communication/9/_history/1",
        "etag": "1",
        "lastModified": "2020-09-07T19:33:36.981+03:00"
      }
    }
  ]
}
|
|